
A Simple Polling App
This tutorial was originally proposed to build an automatic admin backend in Python’s popular framework Django. The link is found here. It addresses such an application that you, as a web master, create a few polling questions, and let web visitors to vote. You will learn how to do that in Genelet, plus the following features:
- To have two role groups of visitors: one for admins and one for public viewers;
- To authenticate admin users;
- To build public viewers’ API.
You are assumed to have a shell access to Unix/Linux where an Apache or other web server is running.
1.1 Download Genelet
After landing on your home directory in Linux, you can download the Genelet Perl’s source from GitHub and save them into directory genelib:
$ git clone git@github.com:genelet/perl.git genelib
1.2 Preparing SQLite Database
We are going to use SQLite3 in this tutorial. A SQLite3 database is a file in Linux. It must be fully readable and writable by both you, the Linux user, and the web server. The ideal location is the system /tmp . Create the database geneletdb:
$ sqlite3 /tmp/geneletdb
In some virtual hostings, you may not be able to gain access to /tmp. Then you can create one by yourself. Make its permission to be 777. For example:
$ mkdir tmp; chmod 777 tmp; sqlite3 tmp/geneletdb
Now you are in SQLite3’s prompt. Copy the following schema and run it by ENTER:
BEGIN;

DROP TABLE IF EXISTS polls_choice;
DROP TABLE IF EXISTS polls_question;
CREATE TABLE "polls_question" (
 "id" INTEGER PRIMARY KEY NOT NULL,
 "question_text" varchar(200) NOT NULL,
 "pub_date" DATETIME DEFAULT CURRENT_TIMESTAMP
);
CREATE TABLE "polls_choice" (
 "id" INTEGER PRIMARY KEY NOT NULL,
 "question_id" integer NOT NULL,
 "choice_text" varchar(200) NOT NULL,
 "votes" integer NOT NULL,
 FOREIGN KEY(question_id) REFERENCES polls_question(question_id)
);

COMMIT;
This will create two tables polls_question and polls_choice. Now, quit SQLite3 by Ctr-D. Again, make sure to set mode 777, so both you and the web server have permissions to read and to write:
chmod 777 /tmp/geneletdb
1.3 Generating Initial Code Layout
Go to genelib where help.pl is located
$ cd genelib
First, run it without any argument
$ perl help.pl
This results in the usage:
Usage: ./help.pl [options] table1 table2 ...
 --dir program root, default '$HOME/tutoperl'
 --dbtype database type 'sqlite' or 'mysql', default 'mysql'
 --dbname database name, mandatory
 --dbuser database username, default ''
 --dbpass database password, default ''
 --project project name, default to 'myproject'
 --script script name, default to 'myscript'
 --force if to override existing files, default to false
 --angular if to include Angular 1.3 files, default to false
Then run it, passing the two tables as the arguments:
$ perl help.pl --force --script=/cgi-bin/myscript --dbtype=sqlite --dbname=/tmp/geneletdb polls_question polls_choice
This generates an initial code layout in $HOME/tutoperl. (If you have own tmp, and your home directory is /home/for_example, then you should use –dbname=/home/for_example/tmp/geneletdb.)
Now go to tutoperl to list all the generated file:
$ cd ../tutoperl
$ find -follow
The result should be a tree like this:
./lib
./lib/Myproject
./lib/Myproject/Filter.pm
./lib/Myproject/Model.pm
./lib/Myproject/Pollsquestion
./lib/Myproject/Pollsquestion/Filter.pm
./lib/Myproject/Pollsquestion/Model.pm
./lib/Myproject/Pollsquestion/component.json
./lib/Myproject/Pollschoice
./lib/Myproject/Pollschoice/Filter.pm
./lib/Myproject/Pollschoice/Model.pm
./lib/Myproject/Pollschoice/component.json
./logs
./logs/debug.log
./views
./views/admin
./views/admin/error.html
./views/admin/login.html
./views/admin/pollsquestion
./views/admin/pollsquestion/update.html
./views/admin/pollsquestion/topics.html
./views/admin/pollsquestion/edit.html
./views/admin/pollsquestion/startnew.html
./views/admin/pollsquestion/insert.html
./views/admin/pollsquestion/delete.html
./views/admin/pollschoice
./views/admin/pollschoice/update.html
./views/admin/pollschoice/topics.html
./views/admin/pollschoice/edit.html
./views/admin/pollschoice/startnew.html
./views/admin/pollschoice/insert.html
./views/admin/pollschoice/delete.html
./views/public
./views/public/error.html
./views/public/pollsquestion
./views/public/pollsquestion/startnew.html
./conf
./conf/config.json
./www
./bin
./bin/myscript
As a summary, you get Perl classes in lib, web templates (type Template Toolkit) for admin and public in views, configuration config.json in conf, CGI script myscript in bin, and debug.log in logs.
1.4 Run the CGI
At this moment, you should know where your CGI scripts are located. It could be $HOME/cgi-bin or a system directory like /var/www/cgi-bin. Copy myscrip to that directory:
$ cp bin/myscript directory_wheree_CGIs_are
and call this CGI’s URL:
http://WEBSITE/cgi-bin/myscript/public/html/pollsquestion?action=startnew
If you see a page like this
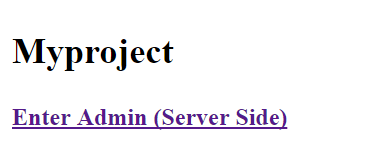
everything should have been set up correctly. If not, double check that myscript is located properly and run-able by the web server.
1.5 Login to Admin
We’d like to explain a little bit authentication here before moving on. Initially, help.pl generates two roles admin and public. The first one, admin, manages the whole website who can access all actions and components. admin is protected by login. The second one, public, is a public role for whom no login is needed. By default, public is limited to access the startnew action of the first table in Help, which in our case is polls_question. Accessing to other URLs by public is denied with status 401.t is pollsquestion. Accessing to other URLs by public is denied with status 401.
The way to control admin’s login is defined in the Issuers block in $HOME/tutoperl/conf/config.json:
"Issuers" : {
  "plain" : {
    "Default" : true,
    "Credential" : ["login", "passwd"],
    "Provider_pars": {"Def_login":"hello", "Def_password":"world"}
  }
}
By default, help.pl always generates the plain issuer for admin, with the built-in login and password being hello and world.
Now click on Enter Admin, which is the page for listing all polling questions
http://WEBSITE/cgi-bin/myscript/admin/html/pollsquestion?action=topics
Because admin is protected, you have to login. On the next screen, input hello and world. You should login, and be redirected to the intended URL page:

Up to now, everything works correctly. Meanwhile, a self-certified ticket is issued and saved in your browser as a cookie. It will let you pass security checks for subsequent visits, until it is expired.
1.6 (optional) Use db Issuer
This is only optional. If you want to use a database table to authenticate admin, you can use db issuer. Under the shell, run
$ sqlite3 /tmp/geneletdb
First, create the account table, polls_admin, for admin:
BEGIN;

DROP TABLE IF EXISTS polls_admin;
CREATE TABLE "polls_admin" (
 "id" INTEGER PRIMARY KEY NOT NULL,
 "login" varchar(16) NOT NULL,
 "passwd" varchar(200) NOT NULL,
 KEY login
);

COMMIT;
Next, add the user hello:
INSERT INTO polls_admin (login, passwd) VALUES ("hello", "world");
You need to replace the above Issuers by the following db issuer in config.json:
"Issuers" : {
  "db" : {
    "Default": true,
    "Credential" : ["login", "passwd"],
    "Sql": "select login, id FROM polls_admin WHERE login=? and passwd=?"
  }
}
Now all the accounts in polls_admin can login to admin.
1.7 Add Questions
Let’s create a poll question. Click on the Create New link. On the next action=startnew page, fill in the first question: Do you like iPhone 7 or 7plus? then Submit. If successful, a confirmation page will be shown as inserted.
Now go back 2 steps using browser’s Back button, to land on the list-all page again. Refresh it, you will see the newly-added question.
1.8 Add Choices
Let’s do the same to add poll choices for this question. Change the name pollsquestion to pollschoice in URL, we get the list-all page for pollschoice:
http://WEBSITE/cgi-bin/myscript/admin/html/pollschoice?action=topics
Click on the Create New link. The action=startnew page should look like:
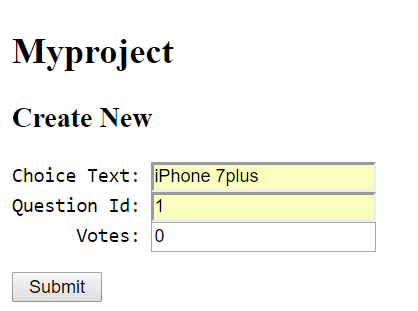
Input the choice: iPhone 7plus, the question id: 1 (the id of Do you like iPhone 7 or 7plus?), the vote count: 0. Submit and you will get them inserted.
Go back 1-stop using browser’s Back. Fill in the other choice to the poll question: iPhone 7, keep the questions id 1 and count 0, and Submit.
1.9 Open to public
You have one question and two choices in your system. Now let public visitors to vote which choice they like.
Since by default, all URLs except for startnew on pollsquestion are forbidden for public, you need to change ACL (Access Control List).
In Genelete, ACL and RESTful properties are managed by component.json, located in the same directory as Model.pm and Filter.pm. See Config and Manual for the full document.
The list-all action is topics. Go to directory Pollsquestion. In componen.json, replace
"topics" : {}
by
"topics" : {"groups": ["public"]}
Repeat the same change for component.json in Pollschoice.
You don’t need to do any change in Model.pm. Visitor public will see the same list as admin. By default, the same RESTful action, which is implemented as a class method in Model.pm, will be shared by all roles.
Yet, for public to view the pages properly, you need View. You can copy them from admin‘s:
$ cd ~/tutoperl/views
$ cp admin/pollsquestion/topics.html public/pollsquestion/topics.html$
$ mkdir public/pollschoice
$ cp admin/pollschoice/topics.html public/pollschoice/topics.html
Of course, you need to edit the two topics.html so their contents are appropriate for public.
Here is final poolsquestion/topics.html:
<!doctype html>
<html>
<head>
<meta http-equiv="Content-Type" content="text/html; charset=utf-8" />
<title>Question Page</title>
</head>
<body>
<h2>Myproject Question</h2>

<table>
<thead>
<tr>
<th>Question</th>
</tr>
</thead>
<tbody>[% FOREACH item IN topics %]
<tr>
<td>[% item.question_text %] <a href="pollschoice?action=topics&question_id=[% item.id %]">Vote!</a></td>
</tr>
[% END %]</tbody>
</table>

</body>
</html>
And pollschoice/topics.html:
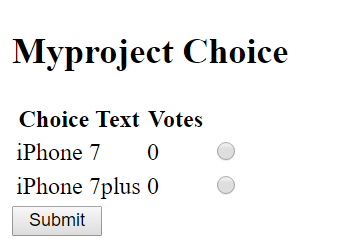
<!doctype html>
<html>
<head>
<meta http-equiv="Content-Type" content="text/html; charset=utf-8" />
<title>Choice Page</title>
</head>
<body>
<h2>Myproject Choice</h2>

<form method=post action="pollschoice">
<input type="hidden" name="action" value="update" />
<table>
<thead>
<tr>
<th>Choice Text</th>
<th>Votes</th>
<th></th>
</tr>
</thead>
<tbody>[% FOREACH item IN topics %]
<tr>
<td>[% item.choice_text %]</td>
<td>[% item.votes %]</td>
<td><input type=radio name=id value="[% item.id %]" /></td>
</tr>
[% END %]</tbody>
</table>
<input type=submit value=" Submit " />
</form>
</body>
</html>
Now take a look at the public poll question and choice pages at:
http://WEBSITE/cgi-bin/myscript/public/html/pollsquestion?action=topics
http://WEBSITE/cgi-bin/myscript/public/html/pollschoice?action=topics
Just to verify, the choice page should look like
1.10 Vote!
So how to vote?
A vote is to add one more count to column votes in table polls_choice. You could achieve this by adding an extra voting method into Pollschoice/Model.pm. Or, you can modify existing update for the purpose. Let do the later solution.
The default behavior of update is to update all fields, not limited to votes in polls_choice. We should leave it untouched if the visitor is admin but make changes if the visitor is public. In Pollschoice/Model.pm , add
sub update {
  my $self = shift;
  my $ARGS = $self->{ARGS};
  my $role = $ARGS->{_grole};
  return $self->SUPER::update(@_) if ($role eq 'admin');
  return $self->do_sql("UPDATE polls_choice SET votes=votes+1 WHERE id=?", $ARGS->{id});
}
So updating by public will add one more count to column votes.
Of course, update should also be open to and its view should be created for public in Pollschoice/Filter.pm. Make the ACL change:
"update" : {"groups" : ["public"], "validate" : ["id"]}
And copy the view from admin:
$ cd ~/tutoperl/views
$ cp admin/pollschoice/update.html public/pollschoice/update.html
Now, go to the public choice page:
http://WEBSITE/cgi-bin/myscript/public/html/pollschoice?action=topics
and click on vote several times. Refresh. You should see that the voting counts are increasing.
Congratulation! You have almost finished the project in Genelet.
1.11 Override topics
What we meant “almost” is that the app does not work well with more than one questions. Go to admin‘s pages, add the second question: Where would you like go in New Year Eve? and attach three choices to it: Quebec City, New Orleans, and Stay at Home. Now, if public hits the choice page, she would see 5 choices: 2 from the first question and 3 from the second question!
The solution is to override the topics method so that only the choices belong to a specific question_id, which you can pass in the query, would be returned. Here it is:
sub topics {
  my $self = shift;
  my $ARGS = $self->{ARGS};
  my $role = $ARGS->{g_role};
  return $self->SUPER::topics(@_) if ($role eq 'admin');

  $self->{LISTS} = [];
  return $self->select_sql($self->{LISTS},
    "SELECT * FROM polls_choice WHERE question_id=?", $ARGS->{question_id});
}
Now, hit the public choice page with question_id=1. It only lists the 2 choices!
1.12 Logout
Just to hit:
http://WEBSITE/cgi-bin/myscript/admin/html/logout
will logout you from role admin. You will be redirected to the front page, as defined in config.json.
1.13 Public API
In Genelet, every time when a HTML is displayed, there is a JSON API as well.
For example, GET all poll questions at:
http://WEBSITE/cgi-bin/myscript/public/json/pollsquestion
GET all choices belong to specific question_id:
http://WEBSITE/cgi-bin/myscript/public/json/pollschoice?question_id=xxxx
To vote a choice with choice id, send PUT to
http://WEBSITE/cgi-bin/myscript/public/json/pollschoice
with the http request body id=yyyy.
These three APIs should be good enough for a 3rd-party to access data and vote on your system.